Definition of MOXIE:
1: energy, pep; 2: courage, determination; 3: know-how

Definition of STAMPIN' MOXIE:
Using your personal energy, ideas, likes and loves to express yourself through the medium of stamping and crafting.

What's YOUR Stampin' Moxie style?

I believe we all have our own moxie. We each have a tune with which we march throughout our lives. Our moxie can change, too, as we change and grow through personal experiences and by witnessing the changes around us.

Part of the beauty of our moxie is being able to share it with one another. I enjoy sharing my moxie through crafting and have found that I can share a little something of me through the various projects I create. My desire is to share something I enjoy with others and allow them the opportunity to bring their own moxie out through crafting. Is your stampin' moxie style defined? Is it "vintage"? Is it "whimsical"? Is it something in-between or all of the above? Find out YOUR Stampin' Moxie style! Then, share with others...

Monday, August 17, 2009

Storage Idea...

Ok, so as I've collected clear stamps from JoAnn's, I've saved a bunch of the little baggies that the stamps come with and have thought "There must be something I can do with these things!" FINALLY, it came to me!


I ended up making one of my own "clip-it-up" version's based on another bloggers instructions for the same thing. I love that now I can clip up my stickers and other items instead of hiding them in drawers never to see the light of day. The other day I was punching some butterflies for a card and thought "I won't be able to use all of these, but I want to save them somewhere I won't lose them." So...I put them inside the little bags that the clear stamps from JoAnn's come in and clipped it up and VIOLA! Now I can see them and know where to find them when I want them!


Here's a pic of the little bags with stuff inside - and where I hung them:

Monday, August 10, 2009

Flowers, Flowers, Flowers!

Ok, so this one falls under both paper crafting and "other" crafting:

My DH and I needed to get some new growth into our front walkway, so we picked up some flowers and I spent an evening putting them into the ground. Now, I am NOT a green thumb, but hubby is and hopefully these will last! :) I did enjoy feeling like I'd accomplished something - even if it wasn't in paper crafting!

That said, our neighbor's daughter fell and broken her forearm and my son's made up some cards and we got some lollipops - but I couldn't just give them her plain, so I added some "flowers" to the top and stuck them in a cute little pink bucket (her cast was pink, so I felt it fit!)

Monday, August 3, 2009

Late, Late, Late...

for a very important (post) date! Well, not really important, just late! :)

Have you ever started crafting something and then set it aside because there was something about it you couldn't make work, only to find it WAY later on and then everything just came together? Well, that's what happened with this card. I'm sure I CAS'd it from something, but have no clue as to what, but here it is> I originally didn't have the flowers and bling on the top or the sentiment on the lower left side. But I ended up deciding I wanted to put those on and I liked the result.

Tuesday, July 7, 2009

A VSN, A "Pretties" class, and a little gift for a friend...

Sorry I've been out of the blogger-sphere for awhile. Since our return from vacation I've been
trying to keep afloat with the other demands of life. But I have had a few times to craft, here and there, and even make a little gift for a friend. The "popscicle" card I made with my SIL during our most recent VSN, and the "Friend 2 Friend" gift is actually 3 Hersheys milk chocolate bars wrapped up with a little "bling" for a friend. Sorry the candybar photos are out of order, but I was having a little trouble with getting the pictures in the right order! :)
Hope you enjoy!


Wednesday, June 10, 2009

CD folder instructions

I've had a number of requests for more info on the CD folders so I thought I'd put some basic instructions up for anyone interested. These are the instructions I received from my friend after took her class - but I know these albums have been out for a bit so I think it's Ok to post these. It's really just a basic framework and then you do all the embellishing to whatever level you want.

CD FOLDER ALBUM INSTRUCTIONS:
You'll need 3 CD folders for each album.

1. Fold 3 CD folders at the score marks
2. Fold 2 pieces of cardstock (5" x 10") in half - if you are going to stamp these, make sure you stamp it before folding it. These 2 sheets will be the "glue" that holds the 3 CD folders together. Use sticky strip to attach the cardstock to the folder. Make sure the fold of your cardstock is flushed with the spine of the CD folder. Tip: make sure all 3 folders are faced right-side up before "gluing" all together.
3. Take 3 pieces of cardstock (5" x 11") and score at 3, 3 1/2, 4, 4 1/2, 5, 5 1/2, 6 - if you awre going to stamp these, make sure you stamp it before folding it. Fold at score marks and insert into 3 CD folders. Insert the short end on the left side. Tip: you will want to use your bone folder to make each crease neater and each fold flatter.
4. Place ribbon around your entire album - ribbon should be approximately 28 inches long.
5. Adhere the front and back cover to your album - 5" x 5" squares.
6. Adhere 5" x 5" squares also to the left side of each folder. You will need 3 squares. Optional: use half of a 3/4" circle punch to make the notch in your paper to match the notch of the folder.
7. To cover the right slanted pocket of the folder, get a 5" x 5" square and insert it into the pocket. Trace the pocket and then cut. This may take some practice and adjusting. You may want to make a template or a pattern for this piece.
8. Adhere the "mini-cards." You will need 9 of them (3 1/2" x 2 3/4"). Make sure you round the corners before adhering the tabs. The envelope size is 3 1/8" x 3 1/8". You can insert more envelopes if you wish.
9. For the circle page on the last page of the book, use the coluzzle to make the circle. Use the largest circle and the next to the largest circle sizes.
10. Add desired embellishments to the front cover, mini cards, and pages.

Ok, that's it! Now...go and create...and ENJOY!

Friday, June 5, 2009

CD Folder Albums

After taking a class on making the CD folder albums, I put together one of my own using a different DSP. I chose a blue/green theme as I'm going to give this particular one to my oldest son's teacher for an end-of-the-year gift. I know she likes blues, so I went with it. I think I'm going to have to make some more of these...


Wednesday, May 13, 2009

Back in the saddle...well, mostly


I'm feeling a lot better following my flu experience - and thank you to everyone for your kind words!

My voice studio is having its Spring recital this Friday and so I've made some little gifts for my students and also the accompanist. Nothing too fancy, but chocolate wrapped up in cute packaging would always do it for me! I got the idea here on splitcoaststampers and thought it would be a fun yet easy way to package the goodies.


I'll be filling the inside with some turquoise paper to surround the wrapped chocolate. I like the extra "bling" on the front too!


Thanks for looking!


Tuesday, May 5, 2009

Down, but not out...

Hello, Everyone!

To say I've been missing from the boards as of late I know is an understatement. I've come down with *ta-dah*: the flu - but, as I don't appear to be squeeling or snorting or desiring to roll in the mud, my doctor's have told me they don't think it's the swine one! What a relief...just the desire to have a truffle or two was beginning to make me a little nervous...

Anyhoo - I've been unable to post OR comment as sitting upright for more than 10 minutes or so doesn't always fare too well. On top of the low-energy and aches, I've also developed a stinker of a cough and my lower right ribcage SCREAMS at me whenever I cough or sneeze. Laying down is best, but with my 3 little ones I can't completely vegge out.

I just wanted to let everyone in the fabulous "Surfin' 11" group know that I know I've been remiss, but promise to get something up and more importantly go and visit all of your wonderful and inspiring blogs very soon (I think I'm on blog withdrawal anyway!)

Sending best wishes to all of you out there in cyber-land and here's hoping you stay clear of any bug-a-roos in your homes!

Monday, April 13, 2009

Flower Fun for Everyone!

It's often that I see wonderful creations I love but not so often that I get to try my hand at making them so soon after seeing them. Today is an exception in that I was actually able to try out the awesome "Flower pot" card I first saw on Elizabeth's blog (she's in 'Surfin' Ocean's 11' group, so check her out!) She did such a fabulous job AND was so great at linking anyone interested to where she first saw them (which include a tutorial...are you seeing how I was able to try this out so quickly?) So, I just HAD to give it a go!


It's pretty late, so I'm not listing supplies now, but I'll try to come back tomorrow and jot a few down (all of the SU DSP is retired, though, and the other DSP is Making Memories.) Flower punch, Scallop punch, scallop sissors (I've GOT to get the SU scallop-edge punch!), RABOM and SU ribbon, brads, dimensionals, etc., etc., etc. LOTS OF FUN!!!


Saturday, April 11, 2009

Late Night Date.........with Elmo!

So my youngest son turned 2 today and we had an Elmo theme for his party. After the boys were all asleep last night I tried to figure out what I could make to liven up our dining room a bit more (along with the regular streamers.) By 11:30pm I had finished, tired, but at least I felt like I was successful in what I was going for.
Most of Elmo was made with my Cricut and some other SU circle punches. I decided to layer him on some 6x6 cardstock to make it pop on the wall and coordinate with the tablecloth. I had some googly (sp?) eyes from a trip to Michael's awhile ago with the kiddos, and felt this was as good a time as any to use them up.

It's a simple layout, I know, but sometimes "more" is just "more work", you know? So I kept it simple and hoped he would like it. I used some tick-tacky stuff to adhere them to the wall so I could pull them down later without tearing the cardstock (and re-use them or offer them to someone else later who might need them.)

I even made a little headband/hat with Elmo on it for him to wear. Of course, getting him to actually keep it on... :)

When he got up today, he went straight to the wall and started squealing and pointing at Elmo - and mommy's heart did a little dance... :) Sometimes, you actually DO get to see your craftsiness appreciated!

Friday, April 10, 2009

Temporary difficulties...

Ok, so I'm trying to add both a background AND a 3-column AND potentially a 2nd page to my blog (in about that order) and I'm having some "issues". :) If you happen to swing by my site and can't read the words or something, hopefully it will be fixed soon! :) There are a few backgrounds I like, but I can't seem to figure out then how to change the color of the posts or the titles of people's blogs on the left so you can read them...if anyone has suggestions, feel free!

A big THANK YOU, too, to Katie over at Katie's Niche (who is in the Surfin' Ocean's 11 group with me, please check out all of the ladies' blogs) for sending me info on doing the above! Now I just need to make it work for me... :) I'm slightly computer non-savvy.

Hopefully I can also add a few of my recent creations - we'll see.

Thursday, April 2, 2009

Ocean's 11: CAS & Monochromatic Challenge

We received the 4th challenge in the blogger group I'm a part of, "Surfin' Ocean's 11" from PeggySue (check out her awesome blog!)
This week it was to do a CAS (clean and simple), small card AND do a Monochromatic theme to it.
Hopefully mine counts for both (I'm not sure if my hint of extra color is Ok!) It was a lot of fun and I really need to keep at the CAS - it's nice to not worry about the extra layering!

Supplies: 3x3 whisper white notecard; whisper white and basic black cardstock; black & white gingham ribbon; black brads; black Staz-on ink; summer sun & rose red SU markers; Studio G stamps ($1 spot @ JoAnn's!)

Wednesday, April 1, 2009

From 6 to 3...but that's Ok

I tried my first VSN (virtual stamping night) out at SCS and it was a lot of fun! As this was my first time "playing" I had to learn about the rules and how to do it, but it was worth the effort and I learned quite a bit. I had hoped to do all 6 of the challenges, but with the time frame and my 3 young boys, I was just happy to get through half of them! Here is a picture of the 3 cards I completed (you have to finish your project in 45 minutes - but you can upload them anytime before the deadline date. The challenges were on Saturday but you had to have them uploaded to SCS by Monday night.)
The top card (with the fish) was for the "Mandalay Bay" challenge and we had to use some sort of ocean theme or animal, and also the shape of a playing card (or an actual card from a deck if you wanted.) I went with the shape itself and also riffed on the slot-machine, three-in-a-row "jackpot" feel.
The lower right picture (with the little boy) was for the "Circus Cirus" challenge where we had to use the color orange and also fit some type of circus theme into the card. This was actually the first of the challenges that were listed and the first one I played. I didn't feel too creative with my version, but at least I did it. I thought of when I first went to Circus Circus myself, and had my oldest boy with me at the time (he was quite young, though) and how we enjoyed the treats there and the circus.
The final card on the left was for the "Luxor" challenge. This one had to use a triangle shaped card (like the shape of the pyramid) and also use the "faux felt" technique. As I'd never done either of these things, it was quite the challenge. I kept thinking of the phrase, "Vegas, baby!" and so I riffed on that with my little baby-theme (I figured it could be cute for someone announcing a birth or even having a baby shower in the NV area!)
All my supplies are listed in my SCS gallery, so instead of repeating them, I'll just post links to them. I'm sure the closer pictures there are a little better - take a peek if you'd like!
Whew! Now that I've got at least part of one SCS VSN under my belt, I'm looking forward to trying my hand at the next one! If you've never played, give it a try! I really enjoyed using my stash and trying to come up with stuff on my own within the challenge ideas given.

Thursday, March 26, 2009

Same idea, different theme...

My SIL and I had our VSN last night and I walked her through the gift card holder from my last post (the Ocean's 11 3rd challenge.) I decided to do a wedding theme this time, since I'm always wondering how best to package gift cards or cash for wedding gifts. Here's it is:
Supplies: Whisper White, Gable Green cardstock, Target DSP "Wedding" theme; corner rounder punch; word window punch (for gift card slot on inside); Rose Red & Gable Green ink, Timber Brown Staz-on (to stamp cake); blender pen; Prima flower; Gable Green brad; stampin' dimensionals

Monday, March 23, 2009

Ocean's 11: Dry Embossing Challenge

Well, I finally got the 3rd 'Ocean's' challenge done: Dry Embossing! Dell over at "DaDoodleDiva" gave us this week's challenge and her sample is here!

And here's mine:

I thought I could get to this challenge a lot faster than I did - but my hubby ended up requesting my help with a banquet he was putting together for our church. He realized about a week and a half before it was to happen that he really hadn't spent time thinking about the entertainment. So, what's a guy to do? Well, ask your wife - particularly if she was a vocal major in college! :) He wanted a Broadway themed night and asked if I'd be willing to put together a 30-40 minute program - so that ended up taking A LOT of my focus over the past week and a half! Add to that the fact that my almost 2 year old has not been sleeping well (more teeth) and I was just praying to stay healthy enough to pull the whole thing off. Thankfully, I did - and the banquet was for the most part a success and I was very happy for him. I even had a friend there who happened to have a new digital video camera who recorded the whole performance and who was willing to put it on a disk for me - so maybe if I'm daring I'll put some of it here - since one of the "S's" in my title does refer to singing! Well see...

As far as this challenge, I didn't think I'd have as hard a time coming up with something, but then again, I realized that I hadn't taken my dry embossing stuff out for YEARS! I only have 3 of the SU little templates (and they are all retired!) That made it even a little more of a challenge since I just couldn't come up with a great idea. Then I remembered that I had made these little gift-card holders the week before (one was for my nephew's birthday.) I got the idea for the gift-card holder from Dawn Griffith over at "Dawn's Stamping Studio" and I just had to try it out! Today, I realized that my "Love without End" dry embossing template would work well with the circles on the DSP from the SS Kit "Party Pieces" (also retired - but hey, I'm using it up!) Anyhoo - here's another photo of the embossed one along with another one I did (no dry embossing):

Ok, sorry for such a loooooooong post! Thanks for looking!

Supplies: "Love without End" dry embossing template (SU); Whisper White, Pumpkin Pie, Tempting Turquoise, So Saffrom, Old Olive cardstock (SU); SS Kit "Party Pieces" (SU); Word Window punch; Tempting Turquoise & So Saffron brads; stampin' dimensionals.

Wednesday, March 11, 2009

Surfin' Ocean's 11 - "Sky" Challenge

Ok, so I'm getting this one done a little earlier than the last one...

Elizabeth put togther this week's challenge: to have a "Sky" in our card, layout or altered item. Her beautiful creation is HERE:

I've always admired people who can create a realistic background, but I'm not one of them (yet!) This idea was the first one to pop into my head, so I went with a basic sky and also figured I'd put that word in the card too. Here's mine:

And the inside

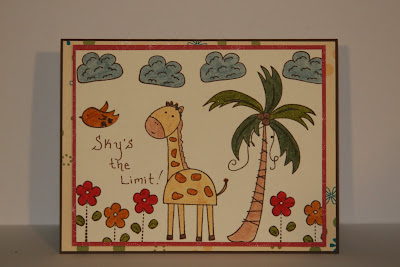
Pretty simple and straightforward, but I like it. I just got these stamps so I wanted to use them! I have another idea floating around for a possible alternate sample, which would hopefully do the theme a bit more justice - we'll see if I can get some more crafting time in to make it a reality! Until then...

Supplies used: "Mindy's Zoo" set from Autumn Leaves; "Small Sayings" set from SU; Chocolate Chip, Vanilla, SU DSP; Timber Brown Staz-on; SU Markers: Chocolate Chip, Close to Cocoa, Creamy Caramel, So Saffron, Ruby Red, More Mustard, Old Olive, Always Artichoke, Bordering Blue; Stampin' dimensionals

Saturday, March 7, 2009

Ocean's 11: 3-D Challenge...and a little something else

Ok, so how does the saying go..."Better late than never!" Yeah, I'm getting this in just in time!

I've joined my first "blogger group" - Surfin' Ocean's 11 (I just love that name! And I have everyone's blog listed here on the left side - please check them out and get INSPIRED!) and the members decided to start up a challenge for our little band of uber-crafters. Each week we'll rotate taking the lead in announcing a challenge, and then each member of the Ocean's group can join in and post their creations that revolve around the posted challenge for that week. Sounds easy enough, right? Well, this is the FIRST challenge I've ever done - and I've been mulling it ALL WEEK!
This first challenge was issued by our fearless, crafty leader, Chirleen! She asked for a Spring themed, 3-D item. I took a leaf from a card I made with my SIL a couple months ago - and made it work for this particular theme. I really liked the look of the "cup card" when I first made it with my SIL, but mine ended up too flat before - so when I decided to try a cup on THIS card, I made sure to go for the 3-D effect and really round it out. In addition, I used colors that I felt were compatable with a Spring theme. I also mulled what kind of saying I could use, and since this cup reminds me of tasty lemonade, I thought I'd riff on the "sweetness" of that drink (and probably put a saying inside that says something like: "Just like a great glass of lemonade, you're too sweet!" (Kind of like a Thank You of sorts, probably cheesy, but there you go!) Here it is:
My supplies used: Pumpkin Pie, Old Olive, Whisper White cardstock; Summer Picnic DSP; SU "Tart and Tangy" set; SU "So Very" set; Pumpkin Pie classic ink; Vellum cardstock; Ticket-corner punch; 2-way glue pen & Dazzling Diamonds glitter; stampin' sponge; & stampin' dimensionals (for the layers of cdstock underneath.)

So there it is! My very FIRST challenge card ever! :) I'm just glad I actually got it done! My family went camping last night and around midnight my middle son started to get sick (as in, grab a bucket, sick.) So...we hauled ourselves back home around 2:15 a.m. (which actually was a blessing because it was COLD outside in a tent!) Needless to say, I've been feeling a bit tired all day, but I was determined to give this a go. I'm really just looking forward to getting some fabulous inspiration from all the Ocean's ladies and learning how to stretch (and ink) my proverbial crafting wings!

On another crafting note, I had another VSN with my SIL recently and here are some pics of the paper-bag book we did (we each used whatever color scheme and sets we wanted - we just work in "real time" together over our computer cameras.) I hadn't done one of these in a few years, so although I know I could have done better with layouts and embellishments, I'm just glad I crafted something again! Due to time, I'm just uploading a couple of the page layouts. Here it is:

Supplies used: SU "Delight in Life" set; So Saffron, Ruby Red, Certainly Celery cardstock, ink, and DSP (I don't remember the name of this DSP but I think it was from a hostess Level 1 choice a year or two ago); White ribbon; Ticket-corner punch; So Saffron brads; 1 1/4" circle punch; stampin' dimensionals

Sunday, March 1, 2009

Post-Valentine wrap up


Ok, so here are a couple of items that I worked on for Valentines: The first two pictures are of an item that I worked on along with my SIL via our VSN. I'm not sure if she learned this from someone she crafts with in CO or came up with it herself. Regardless, it was a fun effort and my son's teacher enjoyed getting it with her Valentines mailbox. (In case the picture isn't very clear, it just spells out Happy Valentines.)

The second item is the card I gave to my hubby on Valentines. I saw a thread on SCS entitled "suggestive sentiments" and had a few good laughs at many of the suggestions given. Lots of great ones! I decided to try my 'Favorite Teddy Bear' set from SU and create a little something special for my "honey".

Friday, February 20, 2009

Update on Mini Magazine Holders info

Ok, so I've had some requests for more info on the magazine holders. They are cute and fun to make - but I didn't come up with the project! :) Here's a link to the original one I saw on SCS that made me want to try them: http://www.splitcoaststampers.com/gallery/photo/1184460?cat=5661&si=mini%20magazine%20holders

In the info section of that post, the crafter has listed her blog where she shows the craft: http://custampin.wordpress.com/2009/01/07/christmas-gifts-part-2/

Hopefully it's OK to post links to other blogs like this... :) Someone let me know if otherwise...but I think she did a great job and I certainly was inspired to try it out myself! Enjoy!!!

Wednesday, January 28, 2009

Busy as a (stampin') bee...


Here are some of my latest efforts in the crafting world. The valentines mailboxes will be for teachers for my kids. I can really see me getting into making more of the "mini magazine" holders too! :)