Definition of MOXIE:
1: energy, pep; 2: courage, determination; 3: know-how

Definition of STAMPIN' MOXIE:
Using your personal energy, ideas, likes and loves to express yourself through the medium of stamping and crafting.

What's YOUR Stampin' Moxie style?

I believe we all have our own moxie. We each have a tune with which we march throughout our lives. Our moxie can change, too, as we change and grow through personal experiences and by witnessing the changes around us.

Part of the beauty of our moxie is being able to share it with one another. I enjoy sharing my moxie through crafting and have found that I can share a little something of me through the various projects I create. My desire is to share something I enjoy with others and allow them the opportunity to bring their own moxie out through crafting. Is your stampin' moxie style defined? Is it "vintage"? Is it "whimsical"? Is it something in-between or all of the above? Find out YOUR Stampin' Moxie style! Then, share with others...

Saturday, March 12, 2011

Bonus Bunny!

One more item to enjoy that's connected to the upcoming Card Buffet on March 26th - The Bonus Bunny!

Look at this little guy! Isn't he sweet? And, if you sign up for at least 20 cards for the Card Buffet class, he's yours to make - for FREE! You can fill him up with goodies for Easter, give him to teachers, neighbors, little ones, anyone you'd like to give a special Easter time gift.

If you're not interested in the Card Buffet but ARE interested in this little guy, have no fear - you can still sign-up to make him that night. It's $5.00 to make him and get the supply list and details on how to recreate him yourself. If you're interested in making more than one, than sign up for as many as you'd like - $5.00 for the first one & $3.00 each one after!
Special acknowledgment: Tammy at 'Dream, Create, Share' for her bunny tutorial

Friday, March 11, 2011

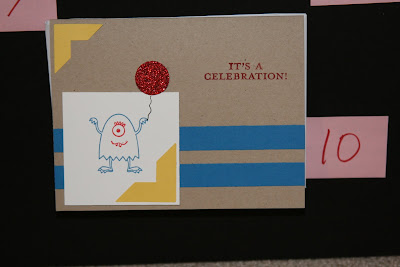
Card Buffet - Birthday Bash


Ever need a birthday card quickly but realize you haven't made one or just don't find the time to get them made? Have A LOT of birthday cards to give out each year and struggle to get them out on time?

Enter: The Birthday Bash Card Buffet!

At a Card Buffet, you pre-select cards from the offerings that you'd like to make during the class (and how many of each card you'd like to make.) Then, with all of the major cutting & measuring done for you, stamp, punch and adhere your way to a collection of wonderful cards you can pull out at the drop of a hat when you need them! This next Card Buffet class will focus on Birthdays: card options for women, men, teens and kids are available!

What: Birthday Bash Card Buffet

When: Saturday, March 26th, 2011 from 6-9pm
Cost: $20 for 1st 10 cards; $1.50 each after 1st 10 (envelopes are not included, but all cards are standard 5-1/2" x 4-1/4" cards.

Bring: Sissors and adhesive to adhere your cards

* To reserve your spot and in order to have your cards prepped and ready, payment for your cards is required by: Wednesday, March 23rd. I'll be sending out an email to everyone currently on my mailing list, so if interested please reply with:

- Which cards (1-10) you want to make AND how many of each of those selected cards.
For example:
- Card #2 - 5 cards
- Card #7 - 5 cards
- Card #8 - 2 cards
- Card #10 - 3 cards
-----------------------
Total cards (15) = $35 ($20 for 1st 10; $15 for other 10 cards)

Come get your crafty on at the Birthday Bash Card Buffet and make some cards for all your birthday needs!
Special acknowledgements to: Mary Fish, BethAnn Wilson, Barb Mullikin, Diane Stader, Danielle Daws, Lisa Young, Karen Haman - for card inspirations or CAS's.

Monday, March 7, 2011

OSW (One Sheet Wonder)

If you've never given a One Sheet Wonder (OSW) a try, you should. It's a fun and easy way to make a quick supply of cards without too much effort. I based this OSW off a 12x12 OSW template by Stephanie (akstampmama over at splitcoaststampers.com) which included a tote to hold the cards. I only made 6 of the cards from the template but you could easily do all of them. This particular OSW was made as a door prize for the Greenhouse Gala Spring Tote Ensemble class I just had on March 5th.
Here are the six cards all together - a little extra bling never hurt!

I actually veered off the template for the above card and used one of the square punches to make the center pieces.

The scallop punch is a quick and easy way to add a little pizazz to a card. I also used the small circle punch from the Itty Bitty Punch Pack.

Again, I used some of the Itty Bitty Punches to create the flowers in the lower corner. It doesn't take much time but it adds a nice compliment to the OSW piece.

By layering the punched sentiment piece you can add some extra fun!


Three easy panels from the OSW layered on top of coordinating cardstock creates the centerpiece of this card. Using the Itty Bitty Punches along with some jewel bling and you're all set!

Finally, one of the stamps from the Sale-A-Bration Punch Bunch set is perfect for this card and the scallop border punch and jewel bling tie it all together.

So, the idea is simple: cut into sections either one stamped or one sheet of DSP (designer series paper) and use those sections to make cards, scapbook page elements or 3D items. In my version today, I based mine OSW off of a tutorial for a 12x12 sheet of DSP - but didn't actually use all of the 12x12 for the OSW. I made the tote and all 6 cards from essentially 1 sheet of 12x12 DSP and some coordinating cardstock. You can add additional bling and sentiments to round out your creations, but all the major work is done for you by simply following the OSW template. See what you think and then try your hand at a OSW! Here is the link for Stephanie's post on her OSW template: http://www.splitcoaststampers.com/forums/templates-f143/au-chocolate-tote-cards-osw-t243314.html
Now, go stamp and ENJOY! :)

Sunday, February 20, 2011

A Tote, a card, and some candy

For my upcoming class on March 5th we'll be making a Spring-time themed tote and card ensemble along with a coordinating candy jar. The Greenhouse Gala DSP from Stampin' Up! is perfect for bringing the warmth of Spring in to push that last bit of winter weather out the door!

There will be a couple of additional surprises for the class too! Stay tuned to see...
Stamp Sets: Thoughts & Prayers (wm - 113252)
Paper: Greenhouse Gala DSP (117167), Pear Pizzazz (119795), Chocolate Chip (102128), Baja Breeze (111352)
Ink: Chocolate Chip (100908)
Tools: 1-3/4" Scallop Circle Extra-Large Punch (119854), Boho Blossoms Extra-Large Punch (119858), Big Shot (113439), Top Note die (113463), Beautiful Wings Embosslits die (118138), Crop-a-dile (108362), Paper-Piercing Tool (116631), Scallop Edge Border Punch (119882)
Final Moxie Pop: Pear Pizzazz Stitched-Poly Ribbon (119265), Early Espresso 1/4" Grosgrain Ribbon (120931), Certainly Celery 1/4" Grosgrain Ribbon (109031), Flower Designer Brads (12579), Pewter Jumbo Eyelets (108432), Basic Rhinestone Jewels (119246), Stampin' Dimensionals (104430), Sticky Strip (104294)

Tuesday, February 15, 2011

"Book of Chocolate", anyone?

I can't imagine not wanting chocolate in any form, so what did I decide to make hubby for Valentine's? Why, a "Book of Chocolate", of course! Complete with dark chocolate and "rules" for consuming said chocolate.

Stamp Sets: Punch Bunch (SAB set, wm - 121847, cm - 123211)
Paper: Basic Black (121045), Basic Gray (121044), Whisper White (100730)
Ink: Basic Black (101179), Basic Black marker (100082)
Tools: Two-Step Owl Extra Large Punch (118074), 1-1/4" Circle Large Punch (119861), Two-Step Bird Extra Large Punch (117191), Full Heart Extra Large Punch (119883)
Final Moxie Pop: Red Glimmer Paper (Occasions Mini: 121790), Stampin' Dimensionals (104430), Sticky Strip (104294)

Friday, January 28, 2011

Valentine's Recap

Greetings from Stampin' Moxie! Here are some items that are for Valentine's. Enjoy!

First is a Valentine's gift package for my son's teachers. Each "pizza box" held exactly 9 Bliss chocolates plus the 3x3 card pictured in front. The belly band of the pizza box, along with red moon on the card, the belly of the owl and the circle under the "Feb. 14th" stamp, and the little heart punch were made with Stampin' Up!'s scrumptious new Glimmer Paper (121790, $3.95). To say I LOVE this stuff is an understatement. Punches go right through it, no mess, no glitter flaking off...just pure glimmering FUN!


Next is the inside of the box. Yummy!


That owl is just too cute! I love to use the owl punch by itself, or pair it up with the Sale-A-Bration "Punch Bunch" set. The googlie eyes for the owl I just found from my son's craft supplies, but the owl punch itself punches out shapes to use for eyes also!

Stamp Sets: Filled with Love (clear mount set - Holiday Mini Catalog)
Paper: Basic Black (121045), Basic Gray (121044), Whisper White (100730)
Ink: Basic Black marker (100082), Real Red marker (100052)
Tools: Two-Step Owl Extra Large Punch (118074), 1-3/4" Scallop Circle Extra-Large Punch (119854), 1-1/4" Circle Large Punch (119861), 1" Circle Medium (119868), Two-Step Bird Extra Large Punch (117191)
Final Moxie Pop: Red Glimmer Paper (Occasions Mini: 121790), Stampin' Dimensionals (104430), Sticky Strip (104294)

Thursday, January 27, 2011

Getting my Moxie back...

Ok, so it's been a LONG time since I've even been on blogger, let alone posted something. After yet another surgery this past December I'm finally getting some of my craftin' moxie back - and it feels GOOD! :)

Looking forward to seeing what I can come up with - and just getting my fingers inky and my stamps rockin'! :)